
This is Part 1 of a Three Part Series
- Part 1:It’s What’s Inside that Counts
- Part 2:Judging a Book by Its Cover:Don’t Forget the Outside
- Part 3:It Ain’t the Volts, It’s the Amps:Some Applications and Considerations
Greetings fellow components users! I hope that you have been well. Have you ever had the need for a high voltage surface mount capacitor, but weren’t sure how to select the right one, or wondered how they are made, or were concerned about the factors you need to be careful of when designing them into your circuit? In my next three posts, I will try to provide some “enlighteningment” on the subject.
Surface mount high voltage MLCCs usually appear to be identical to standard MLCCs. High voltage MLCCs are typically available in EIA size from 0603 to 2225 or larger with voltage ratings from 200V to 5,000V or more. Smaller case high voltage MLCCs typically have lower maximum rated voltages (VRated) as the external terminals tend to be closer to each other in comparison to larger case high voltage MLCCs.
High voltage MLCCs are generally available with Class 1 (C0G) or Class 2 (Ferroelectric X7R) ceramic dielectrics with tolerances as good as +/-5% or better, to as wide as +/-20% or higher. Because of the generally thicker dielectric thicknesses used in the design and potentially the “cascade” or “floating electrode” type designs used, the maximum capacitance values available are significantly lower than analogous low voltage rated MLCCs. Generally available capacitance values range from ~1 pF to 2.2 µF or higher. The ESR is also typically a little higher compared to analogous standard MLCCs, but is still quite low (typically ≤10 mΩ). So what makes high voltage MLCCs different from standard MLCCs?
The More Things Change, The More They Stay The Same
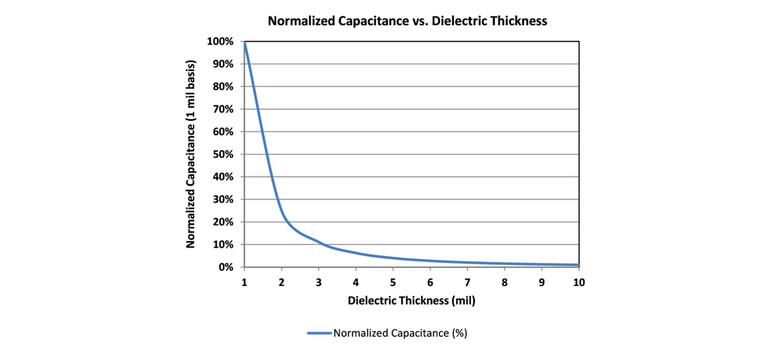
From the outside, high voltage MLCCs look pretty much identical to standard MLCCs, but as my Momma used to tell me, “it’s what’s inside that counts.” It seems that it should be straight forward to design high voltage MLCCs. Just increase the dielectric thickness (DT) to enable the desired voltage rating. The rate of increase in DT is typically about 200 to 250 V/mil (or about 7.8 to 10 V/µm). We also know that thicker DT results in less capacitance per unit volume (C/V), having a DT-2 relationship as shown in Figure 1 below. So if we double DT, capacitance is quartered and VRated is doubled. Simple…right? Wait just a second! As it turns out, it’s not quite that simple.
Figure 1. Approximate normalized capacitance vs. dielectric thickness for standard configuration MLCC
VRated of the ceramic dielectrics used in MLCCs typically demonstrates linear or nearly linear behavior to voltages as high as ~1,000 to ~1,500 V. But at higher voltages, a different VRated vs. dielectric thickness relationship is observed. An example of this is given in Figure 2 below.
Figure 2. Dielectric thickness vs. rated voltage for a typical ceramic dielectric used in MLCCs
For the hypothetical example given in Figure 2, a rated voltage of 1,500 V would require ~10 mil (~250 µm) DT. This would reduce C/V by a factor of ~100 in comparison to a 250VRated, 1 mil DT MLCC! If we could in some way maintain the initial linear relationship (~200 to 250 V/mil) we could have used DT of ~6 mil and C/V would have suffered only about a 35 fold reduction in comparison to a 250VRated, 1 mil DT device (i.e., the resulting maximum C/V would be almost 3 times as high in comparison to the case of 10 mil DT). There must be a way to maintain this relationship, but how?
It’s What’s Inside That Counts
Well, it just so happens that there is a way. Recalling our freshman EE course, we know that capacitors in parallel are additive, while in series behave in a manner defined by the relation:
We also know that, if all of the capacitors that are in series have the same capacitance value, the above simplifies to:*Cn = Capacitance of capacitor n

Wow! Using the above relationships, we can increase VRated linearly with a relatively small decrease in capacitance (~C/n). If only we could fit multiple capacitors in series within a single MLCC…but how? Well, the structure of a standard configuration MLCC puts multiple capacitors in parallel configuration, so why can’t a clever designer put several capacitors in series configuration, within an MLCC as well? It just so happens that, long ago, a very clever MLCC designer did exactly that and these floating electrode or cascade electrode design MLCCs have been available for high voltage applications for decades. Here’s to you, Mr./Mrs./Ms. Clever Designer!
The Details
The basic floating electrode (FE) or cascade electrode designs are illustrated in comparison to a standard electrode configuration design MLCC in Figure 3 below. From the illustration it is evident that floating electrodes placed between externally connected electrodes result in 2 cascades (or capacitors) per each floating electrode segment used in the design. One and two FE (or 2 and 4 cascade) designs are illustrated in the figure. From the figures, we can also see that the electrode active area (A) is reduced with each cascade as well, but if we ignore the dimension of the additional internal margins, the active area is approximately halved for each floating electrode and the rated voltage increases linearly with each internal capacitor in series.
Because of the reduction in A and the series effect described above, the resulting C/V (ignoring the additional internal margin areas created with each FE) is proportional to 1/n2 (where n is the number of cascades created). This means that VRated can increase linearly as the number of FEs is increased, with a C/V penalty that is pretty much analogous to the C/V penalty experienced with a standard capacitor configuration MLCC that utilizes increased DT to achieve desired VRated in the linear region below ~1,000 to 1,500 V (i.e., according to the blue line in Figure 2 above). So now we have a solution to our problem!
Additionally, FE designs largely reduce or eliminate the possibility of short-type failures. This is because all of the cascades or internal capacitors must fail in order to create a short-type failure. Thus failure due to flexure cracking or the like is largely mitigated in most cases. This makes FE type MLCCs also quite valuable in performance critical applications such as across a battery line or the like.
Figure 3. Illustration of standard vs. floating internal electrode configurations
The Particulars
We can use FE or cascade electrode design to increase VRated with minimized impact on C/V. As each FE will have an additional margin area associated with it, the impact of additional margins on C/V in small case MLCCs (typically EIA 0603 and possibly 0805) may be prohibitive, but for larger MLCCs (e.g., EIA 1206 to 2225) the impact is relatively small. As in Figure 4 below, C/V decreases commensurate with (1/2n2), where n is the number of FEs within the design. VRated also increases with 2n as does ESR. The effect on ESR is largely compensated however, as the two or more internal capacitors typically have more electrodes in each internal capacitor stack (N), and since the aspect ratio of said electrodes within each of the internal capacitors will have relatively wide and short electrodes, which results in relatively low ESR, so the actual increase in ESR is typically negligible in comparison to standard configuration MLCCs of similar VRated. Since FE design results in MLCCs having at least two internal capacitors in series, each of the internal capacitors must short in order for the FE MLCC to have an internal short, which is highly unlikely, making FE MLCC highly desirable for applications that are sensitive to short-type failures. Thus, in comparison to standard configuration MLCCs; with careful design, it is possible to achieve high VRated with minimal increase in ESR and decrease in C/V.
Figure 4. Effects of floating internal electrodes on capacitance, ESR and rated voltage
In Summary
Floating electrode (FE) or cascade internal electrode designs may be used to increase VRated of MLCCs with minimal impact on ESR and capacitance per unit volume (C/V) in comparison to standard configuration MLCCs. Additionally, FE designs largely reduce or eliminate the possibility of short-type failures and thus are valuable in battery line and other critical applications. For these reasons, floating electrode or cascade electrode designs are typically superior to standard configuration designs for high voltage applications.
.png?width=1276&height=1545&name=figure1-post3%20(1).png)


